Thursday, March 29, 2012

Bagels

I gave up all restaurant food for Lent. It actually hasn't been too bad. I've been learning to make a lot of my favorite take out food. The benefits of which are major cost savings and I am able to tailor the recipes to be lower in WW points and healthier all around. Now that I have a little more time to dedicate to cooking and baking, I've been getting back into the swing of making most of our food from scratch. I used to make all of our bread and pasta. At one point Vince told me that he prefers store bought white bread to homemade, because that is what he grew up with and knows. *sigh* Sometimes I wonder why I bother. Oh well, I don't eat a whole lot of bread so I pretty much stopped making it. I figured if Vince wanted any he would just go buy a loaf of something he likes.

I've been on a fruit an oatmeal for breakfast kick for quite some time now. I'm actually getting a little tired of it and was looking for something to change it up a little. When I saw this recipe for homemade bagels, I paused. I love bagels. Real bagels. Not the store bought ones, which are ok but not really real bagels. We didn't have time to stop and buy bagels while we were in NY and I had a little bit of a craving. I decided to dive in and try it.

I always thought that making bagels would be really complicated and difficult. It really wasn't that bad! There are a lot of steps involved and you will definitely make a mess of your kitchen but it is so, so, so worth it. I gave some to my neighbors to try and they raved. Vince brought some to work and refused to share. These really are excellent. I will say that they still don't really compare to real NY bagels but they are a good substitute. I found it a little difficult to get the pieces to be the size that I wanted and I wasn't really able to get them into a proper "doughnut-like" shape but they were close. I'll just have to keep making them until I perfect it. :)


Bagels
Adapted from Good Thymes & Good Food


Ingredients
2 Cups Warm Water
4 1/2 teaspoons Active Dry Yeast
3 Tablespoons Sugar
1 Tablespoon Salt
5 3/4 Cups All Purpose Flour
4 Quarts Water
1 Tablespoon Sugar
Cornmeal, for dusting the pan
1 Large Egg, beaten with a little water
Desired toppings (I used poppy seeds, sesame seeds, onion powder, and dried minced onion)

Directions
  1. In the bowl of an electric mixer, stir together the yeast and warm water.
  2. Let stand for 5 minutes.
  3. Add the sugar and salt.
  4. Gradually mix in 4 cups of flour.
  5. Mix with the dough hook for about 5 minutes.
  6. Add in 1 1/4 cups more flour.
  7. Continue kneading until the dough is smooth and elastic, add more flour as needed to prevent the dough from being sticky.
  8. Place the dough in a greased bowl and cover with a clean towel.
  9. Let the dough rise until doubled, about 1 hour.
  10. Punch down the dough and divide it into three equal parts.
  11. Taking one part at a time, for the dough into a log and cut each log into equal size pieces (6 pieces would be the size of a store bought bagel).
  12. Knead each piece into a small ball and poke your thumbs through the center. With your thumbs in the center hole, work your fingers around the perimeter of the dough making a doughnut shape.
  13. Place the bagels on a floured surface and let rise for 20 minutes.
  14. Preheat oven to 400F.
  15. In a pot wide enough to fit 4-5 bagels, boil 4 quarts of water with a tablespoons of sugar.
  16. Adjust the heat to keep the water simmering.
  17. Lightly grease a baking sheet and liberally sprinkle with cornmeal.
  18. Carefully drop the bagels into the boiling water, 4 at a time.
  19. Boil for 30 seconds on each side of the bagel.
  20. Lift the bagels out of the water with a slotted spoon and blot on a paper towel.
  21. Place the bagels on the prepared baking sheet.
  22. Bruch each bagel with the egg wash.
  23. Sprinkle the tops of the bagels with any desired toppings.
  24. Bake for 20 minutes, until they are a rich brown.
  25. Cool on a wire rack.

Yields: 18 Bagels

Wednesday, March 21, 2012

Bailey's Irish Cream Brownies

I came across this brownie recipe as I was looking for something new to make for St. Patrick's Day. I knew that my Friday Night group would appreciate something festive and you can never go wrong with alcohol when it comes to this group.

I made two pans of brownies. One was for our martini group and the other was to take to my grandma's house over the weekend. The brownies come out delicious. They were a wonderful fudgey, chewy brownie with just the right amount of Irish Cream to not make the entire thing taste like a mixed drink. I botched the frosting a little bit but I think if I had actually followed the directions it would have turned out fine. I accidentally melted my butter instead of just letting it soften. I also put in too much Bailey's because I wasn't paying attention to how many tablespoons I had added. This made the frosting turn out more like a glaze and boy was it potent! I tried to rectify it by adding more sugar but that just made it sickenly sweet. I scrapped the whole thing and started over. My second attemp came out much better and I was able to pipe it onto the brownies just fine.

So just a word of caution, follow the instructions when making something new! I learned my lesson this time but I can't say it will stick with me. I have a tendency to just wing it most of the time.


Bailey's Irish Cream Brownies
Adapted from Alida's Kitchen


Ingredients
1 Cup All Purpose Flour
1/2 Cup Unsweetened Cocoa Powder
1/4 teaspoon Baking Soda
1/4 teaspoon Salt
1/3 Cup Chocolate Chips
1/4 Cup Butter or Margarine
1 Cup Sugar
4 Large Eggs
1/4 Cup Bailey's Irish Cream
1 teaspoon Vanilla Extract

Frosting:
2 Tablespoons Butter, softened
1 Cup Powdered Sugar
2 Tablespoons Bailey's Irish Cream
Green Food Coloring

Directions
  1. Preheat oven to 350.
  2. Grease a 9 inch square baking pan with cooking spray.
  3. Put the chocolate chips and butter into a large microwave safe bowl and microwave on high in 30 second increments, mixing in between, until the chocolate is smooth and glossy.
  4. Let the chocolate cool slighly.
  5. Add the sugar, eggs, Irish Cream, and vanilla.
  6. Mix well and then microwave on high for 1 minute.
  7. Add the flour, cocoa, baking soda, and salt.
  8. Fold gently to combine.
  9. Pour the batter into the prepared baking dish.
  10. Bake for 15 minutes, until a toothpick comes out almost clean.
  11. Cool on a wire rack.
  12. To make the frosting, beat the butter until fluffy.
  13. Add the sugar and Irish Cream.
  14. Beat until well blended
  15. Add milk or powdered sugar a teaspoon at a time to reach the desired buttercream consistency.
  16. Add 3-6 drops of green food coloring and mix into the frosting.
  17. Spread or pipe over cooled brownies.
  18. Decorate with sprinkles.

Yields: 16 Brownies

Tuesday, March 20, 2012

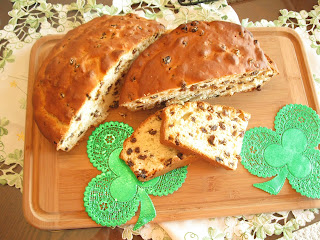
Irish Soda Bread

We just got back from a long weekend in NY visiting family. We spent St. Patrick's Day at my grandma's house in the Bronx. Max wore the cutest little outfit and got lots of kisses, because he's Irish (and really cute)!

Before we left for the weekend, I made a couple loaves of soda bread and two pans of Bailey's Irish Cream brownies. I brought one loaf of bread and one pan of brownies to NY with us and the other I sent upstairs to Nelda for Friday Martini Night. I haven't heard back about how it went over with everyone there but they were a hit at my grandma's house.

I've been making this recipe for soda bread for so long that I don't really know where I got it from. It is a pretty basic recipe and comes out perfect almost every time. It makes a huge round loaf so be prepared to share!


Irish Soda Bread


Ingredients
1/4 Cup Sugar
4 Cups All Purpose Flour
2 teaspoons Baking Powder
1 teaspoon Baking Soda
3/4 teaspoon Salt
3 Cups Raisins
2 Large Eggs
1 1/4 Cups Buttermilk
1 Cup Sour Cream

Directions
  1. Preheat oven to 350F.
  2. Grease a 9 inch round cake pan with cooking spray.
  3. In a mixing bowl, combine the flour, sugar, baking powder, baking soda, salt, and raisins.
  4. Add the eggs, sour cream, and buttermilk.
  5. Mix until well moistened and a very sticky batter is formed.
  6. Pour batter into the cake pan and dust the top with a little flour.
  7. Bake for 65-75 minutes, until the crust is golden brown and the middle is cooked through.

Yields: 1 Round Loaf (approx. 16 servings)

Wednesday, March 14, 2012

Maple Roasted Carrots

I'm always looking for new side dishes and new ways to prepare vegetables. We actually eat a lot of fruits and veggies, especially since I started Weight Watchers since they are all 0 points. When you eat veggies as often as we do, you get tired of side salads and steamed broccoli. I try to mix it up so we don't get bored with them and stop eating them all together. I also want Max to learn to try vegetables in different ways. Right now he will only eat them as purees and if they are mixed together (applesauce with carrots, squash with sweet potatoes, zucchini and green beans with peas and corn).

This recipe is pretty basic and mimics the flavor of candied carrots without having tons of sugar. The carrots came out tender with a nice roasted flavor from the salt and oil. The butter and syrup gave a nice glaze to them but was not overpoweringly sweet.

I served this as the starch with our meal and then served a green vegetable along with it. Doing this makes the small serving size more filling. You could even toss them with a green veggie like spinach or zucchini for a more colorful plate. Vince, who hates his veggies to be sweet, said he would like to have these again. I haven't let Max try these yet, so the verdict is still out on how infant/toddler friendly they are.


Maple Roasted Carrots
Adapted from The Way to His Heart


Ingredients
2 pounds Baby Carrots
1 1/2 teaspoons Extra Virgin Olive Oil
1/2 teaspoon Salt
2 Tablespoons Butter
2 Tablespoons Maple Syrup

Directions
  1. Preheat oven to 425F.
  2. Line a metal baking sheet with foil and lightly grease with cooking spray.
  3. Toss the carrots the salt and olive oil.
  4. Spread the carrots on to the baking sheet in a single layer.
  5. Roast for 12 minutes.
  6. While the carrots continue to roast, heat the butter in a small saucepan.
  7. Simmer the butter until it becomes a deep golden brown, about 1 minute.
  8. Remove from heat and mix in the maple syrup.
  9. Drizzle the syrup mixture over the carrots and toss to coat thoroughly.
  10. Return the carrots to the oven to roast until tender, about 10 minutes.

Yields: 8 servings (approximately 1/2 cup per serving)

Tuesday, March 13, 2012

Fried Couscous Salad

I have to admit that I don't really like Giada. She has always seemed a little pompous to me and I absolutely can not stand how she will insert Italian words with a really thick, fake accent into her dialogue. I happened to glimpse a clip of her show as I was flipping channels the other day and this recipe caught my attention.

Unlike most of Giada's recipes, this one looked fairly simple and didn't require a ton of hard to come by ingredients. It did take a little looking to find Ricotta Salata. I ended up going to a specialty Italian deli in town since none of the regular stores in my area carry it. If you can't find it, you could substitute a different crumbly cheese such as Feta.

The recipe cooked up quickly and was really tasty. Vince raved about it and has requested it again. It is a great side dish for those nights when you want something easy but different than plain old rice. I served it with eggplant the first time and with salmon the next time I made it. It definitely has an Italian taste going on so be sure to pair it with something that the cheeses will go well with.


Fried Couscous Salad
Adapted from FoodNetwork Giada De Laurentiis


Ingredients
2 Cups Low-Sodium Chicken Broth
1/2 teaspoon Salt
1 10 oz Box (1 1/4 Cups) Couscous
1/4 Cup Extra Virgin Olive Oil
2 teaspoons Minced Garlic
4 oz Ricotta Salata Cheese, crumbled into 1 inch pieces
1/4 Cup Sun-Dried Tomatoes (packed in olive oil), chopped
1/4 Cup Grated Parmesan Cheese

Dressing:
1/4 Cup Extra Virgin Olive Oil
2 Tablespoons Lemon Juice
1/2 teaspoon Salt
1/4 teaspoon Black Pepper

Directions
  1. In a medium saucepan, bring the chicken broth and salt to a boil.
  2. Remove from heat and add the couscous.
  3. Cover until all of the liquid has been absorbed and the couscous is tender, about 6 minutes.
  4. Using a fork, fluff the couscous to break up any lumps.
  5. In a large non-stick skillet, heat the olive oil over medium heat.
  6. Add the garlic and cook until golden, about 1 minute.
  7. Increase the heat to high and add the couscous.
  8. Cook, stirring constantly, for 6 minutes.
  9. Continue to cook the couscous, stirring every 5 minutes, until toasted. This will take about 25 minutes.
  10. Transfer the couscous to a large serving bowl and cool for 5 mintues.
  11. Add the cheeses and tomatoes.
  12. In a small bowl, whisk together all of the dressing ingredients.
  13. Pour the dressing over the salad and toss until all of the couscous is coated.

Yields: 12 Servings (1/2 Cup per serving)

Sunday, March 11, 2012

IKEA Swedish Meatballs

I've only been to IKEA a hand full of times and I've never actually eaten there. The one thing that everyone seems to rave about is their Swedish meatballs. Whether buying them frozen to make at home or eating them at the store's food court, it never fails that when you mention IKEA someone brings up the meatballs. Not having eaten them before, I can't say if this recipe is anything like the version that you can buy either at the food court at IKEA or frozen from them. I think on my next trip I'll be trying them out just to compare because honestly, these meatballs were awesome!

They come out moist and flavorful. The gravy is thick and rich. The first night I served it over egg noodles, which was ok, but then I read that IKEA serves them over mashed potatoes with a side of lingonberry jam. I didn't serve the jam but did dish these beauties up over herbed mashed potatoes. It really made all the difference! I can see how the jam would be a nice compliment to the flavor of the meatballs. I will try it out next time.

This is a great meal to make ahead and freeze. Just make a big batch of meatballs and freeze them before making the gravy. Thaw them out and then heat them up with a batch of fresh gravy. Yum!

IKEA Swedish Meatballs
Adapted from Food Network

Ingredients
1 Cup Breadcrumbs
2 Tablespoons Butter
1/3 Cup White Onion, minced
2 teaspoons Garlic, minced
1/4 teaspoon Ground Allspice
2 teaspoons Kosher Salt
1/4 teaspoon Pepper
1/2 Cup Milk
1 teaspoon Worcestershire Sauce
1 pound Ground Beef
1 Pound Ground Pork
1 Large Egg, beaten
1 Large Egg White, beaten

Gravy:
2 Tablespoons Butter
2 Tablespoons All Purpose Flour
1 1/2 Cups Low Sodium Beef Broth
1 teaspoon Worcestershire Sauce
1/4 Cup Heavy Cream
Salt & Pepper to taste

Optional:
Lingonberry Jam for serving

Directions
  1. In a large skillet, heat the butter.
  2. Add the onion, garlic, allspice, salt, and pepper.
  3. Cook, stirring, until soft (about 5 minutes).
  4. Add the milk and Worcestershire sauce.
  5. Bring to a simmer, then remove from heat.
  6. Put the breadcrumbs in a large mixing bowl.
  7. Pour the hot milk mixture over the breadcrumbs.
  8. Stir to make a thick paste, then let cool.
  9. Once cool, add the beef, pork, egg, and egg white to the paste.
  10. Mix until well combined.
  11. Oil a baking sheet with cooking spray.
  12. Roll the meat into 1 inch balls and arrange on the baking sheet.
  13. Cover with plastic wrap and refrigerate for 1 hour.
  14. Preheat the oven to 400F.
  15. Bake the meatballs until cooked through, about 20 minutes.
  16. Once the meatballs have cooked, make the gravy.
  17. Melt the butter in a large skillet.
  18. Add the flour and cook, whisking, until smooth.
  19. Whisk in the beef broth and Worcestershire sacue.
  20. Bring to a simmer.
  21. Add the cream and the meatballs.
  22. Reduce the heat to low and simmer until the gravy thickens, about 10 minutes.
  23. Season with salt and pepper.
  24. Serve over mashed potatoes and with lingonberry jam.

Yields: 10 servings (4 meatballs & gravy)

Thursday, March 8, 2012

Stuffed Mini Sweet Peppers

I found this recipe while looking for fun foods to make on Superbowl Sunday. Vince and I are not football fans at all. A few years ago we started a tradition of having an un-Superbowl party. Basically, we invited people over to watch either a movie or TV series marathon. We serve typical Superbowl Party style food, which means lots of appetizers and junk food.

This one was a big hit. The filling is out of this world. I had several people go in to the kitchen to grab what was left in the bowl and use it as a spread. It really was yummy.

I will say that the recipe made enough filling for 2 bags of peppers, but that could vary depending on the sizes of peppers that you happen to get in the bag. I made a double batch and used some of the leftover filling to stuff some mushrooms that I had. I preferred the mushrooms to the peppers but that is probably just my own taste, Vince like the peppers better.

These were easy, quick, and pretty tasty so I know I'll be making them (and some mushrooms) again.

Stuffed Mini Sweet Peppers
Adapted from The Way to His Heart


Ingredients
1-2 bags of Baily's Mini Sweet Bell Peppers
8 oz Fat-Free Cream Cheese, softened
8 oz Fat-Free Cheddar Cheese, shredded
1 box (9.6 oz) Jimmy Dean Brown & Serve Breakfast Sausage Patties (pre-cooked)
1/4 teaspoon Salt
1/4 teaspoon Garlic Powder
1/4 teaspoon Onion Powder
1/4 Cup Italian Seasoned Bread Crumbs

Directions
  1. Preheat oven to 350F.
  2. In a mixing bowl, crumble the sausage.
  3. Thoroughly mix in the cheeses and seasonings.
  4. Cut each pepper in half, lengthwise, and de-seed.
  5. Generously fill each pepper half with the cheese mixture, making a mounded top.
  6. Roll the tops of the filled peppers in the breadcrumbs.
  7. Place in a greased baking pan.
  8. Bake for 20 minutes.

Yields: Approximately 24 servings (2 pepper halves per serving)

Friday, March 2, 2012

Beef Wellington Hand Pies

I've always wanted to make beef Wellington but was a little intimidated by the work involved in making the real thing. Add to that the fact that I rarely have that much time to prepare a meal and well, I've never made it. Last Christmas I received a copy of the Harry Potter Cookbook. There are several recipes in it for "pasties" or hand pies. These are pretty common in the UK and are really tasty. They are basically like little pot pies with all sorts of meat and vegetable fillings.

I had bookmarked a recipe for Beef Cornish Pasties and had planned to make it this week when I ran across this recipe for Beef Wellington Hand Pies. I was so excited to finally be able to try to make an easy version of beef Wellington that I immediately started making them, without checking to see if I had all of the ingredients first. Low and behold, I was out of red wine. The horror! How could I let this happen!?! I ran upstairs to my awesome neighbor to steal 1/4 cup for the recipe. She sent me home with the entire bottle. Because really, it would be a tragedy to not be able to have a glass or three with dinner. I love her. :)

The recipe itself is not what I would call "easy" but it isn't difficult either. It is pretty time consuming but you could make a large batch and freeze some to have at another time.

The flavor was really good and it went well with the Merlot I was drinking that night. I will definitely be making these again.

A couple of tips to help things go more smoothly:

Keep your puff pastry dough in the fridge while you are working. It gets really gooey and hard to handle if you let it sit out.

I found it was easier to move the pies from the rolling surface to the baking sheet if I waited for the meat to be cool before filling the pies. Filling them while the meat was warm ended up making the bottom of the pie gooey and difficult to pick up.

Beef Wellington Hand Pies
Adapted from Caitlin's Cooking


Ingredients
3 Sheets Puff Pastry, thawed
1 Tablespoon Extra Virgin Olive Oil
1 1/2 lbs Ground Beef
1 Tablespoon Butter or Margarine
2 Cups Cremini Mushrooms, diced
1 Sweet Onion, diced
1 10 oz Bag Frozen Peas and Carrots
2 teaspoons Minced Garlic
1/2 teaspoon Thyme
1/4 Cup Red Wine
2 Tablespoons Heavy Cream
2 teaspoons Worcestershire Sauce
1 Large Egg


Directions
  1. In a large skillet, brown the ground beef.
  2. Drain the beef and set aside.
  3. Heat the butter and olive oil in the skillet.
  4. Add the onions, mushrooms, peas and carrots.
  5. Cook until the vegetables are tender, about 5 minutes.
  6. Add the garlic and thyme.
  7. Deglaze the pan with the red wine.
  8. Stir in the cream and Worcestershire sauce.
  9. Add the beef and mix thoroughly.
  10. Remove from heat.
  11. Grease a baking sheet with cooking spray.
  12. Heat the oven to 400F.
  13. Roll a sheet of puff pastry out to about 1/8" thickness.
  14. Cut the sheet into four equal size squares.
  15. Spoon the beef mixture onto one half of each square, leave about 1/2" at the edges.
  16. Whisk the egg with a little water to create an egg wash.
  17. Lightly brush the edges of the pastry squares with the egg wash.
  18. Fold the pastry tops over the meat to create the pies.
  19. Crimp the edges with a fork to seal.
  20. Arrange the pies on the prepared baking sheet.
  21. Repeat steps 13-20 with the remaining two puff pastry sheets and filling.
  22. Once all of the pies are made and on the baking sheet, brush the top of each one with egg wash.
  23. Cut two small slits in the top of each pie, for venting.
  24. Bake for 20-25 minutes, until golden brown.

Yields: 12 servings

Thursday, March 1, 2012

Peanut Butter Bars

I think I've mentioned before that we have a group of friends in our building that get together for Friday night dinner and cocktails in one of the penthouse condos. We lovingly call it Martini Night on the Roof. Over the years, each of us has fallen into the habit of being in charge of one aspect of the night. Our hostess, Nelda, graciously provides cocktails and appetizers for everyone. One couple will bring a main dish such as chicken or pizza. Another couple brings wine for dinner. One couple does all of the dishes and clean up. My role is to bring dessert.

That being said, I'm constantly looking for new recipes to try out. Everyone in our group has different preferences when it comes to dessert so I try to vary the flavors from week to week. I had bookmarked this recipe for peanut butter bars some time ago. They looked easy and fast, and really who doesn't like a good peanut butter bar? These did not disappoint. The entire pan was consumed on Friday night and Vince asked me to make another pan just for us to have at home. The peanut butter icing is killer and really makes this more decadent than it already is. The middle stays soft and chewy and the mini chocolate chips add that "Reese's" taste to it. You really can't tell that there's oatmeal in it at all, for anyone that might be skeptical on that count. I'm sure I'll be getting some requests to bring these to Martini Night again.

Peanut Butter Bars
Adapted from Lolly's Sweet Treats


Ingredients
1/2 Cup Margarine, softened
1/2 Cup Sugar
1/2 Cup Brown Sugar, packed
1/2 Cup Creamy Peanut Butter
1 Large Egg
1 teaspoon Vanilla
1 Cup All Purpose Flour
1/2 Cup Quick Cooking Oats
1 teaspoon Baking Soda
1/4 teaspoon Salt
1 Cup Mini Chocolate Chips

Icing:
1/2 Cup Powdered Sugar
2 Tablespoons Creamy Peanut Butter
2 Tablespoons Milk


Directions
  1. Preheat oven to 350F.
  2. Grease a 9x13 pan with cooking spray.
  3. Cream margarine, sugars, and peanut butter in a mixing bowl.
  4. Add the egg and vanilla.
  5. Mix well.
  6. Mix in the flour, oats, baking soda, and salt.
  7. Spread the batter into the baking pan.
  8. Sprinkle the top with chocolate chips.
  9. Bake for 15-20 minutes, until golden brown.
  10. Remove from oven and allow to cool.
  11. Once cool, mix the icing ingredients together and drizzle over the top.
  12. Cut into squares or bars.

Yields: 24 servings