Showing posts with label Muffins and Breads. Show all posts

Thursday, October 4, 2012

Wee Bites - Sweet Potato Pie Bread

This is one of those recipes that came about by a fortunate series of events. We like to go to the local farmer's market every Sunday morning. Max loves to run around there and we always find something we just had to have while we're there.

Two weeks ago, while my mom was here, we brought her with us to the market. We wondered around checking everything out. Max became fascinated with the large bins of sweet potatoes at all of the vendors. Finally, we let him pick a few out to take home. He was so excited about his potatoes! But being a toddler with a short attention span, the beloved potatoes were soon forgotten about and thrown into a bin in the fridge.

Fast forward to grocery shopping day last week. I always, always, always, meal plan. This has not only reduced our food budget by half (that's right, I said HALF!), it is also a great way to keep me on track with my Weight Watchers points for the week. In order to meal plan effectively, I go through our pantry cabinets, the freezer and the refrigerator to take stock of what I already have on hand. I then go through my coupon stash and the weekly flyers to check for sale items. Doing this has cut our food budget by at least 1/4. I went from spending close to $800 a month on grocery bills to roughly $300-400 per month. This includes household items like toiletries and cleaning supplies.

Anyway, while looking through the fridge, I found the long lost sweet potatoes. They needed to be used in a hurry. The meals I had planned for the week didn't really go with having sweet potatoes as a side so I had to come up with something else to do with them.

Max has been devouring fruit and veggie muffins lately. The kid is a bottomless pit. I swear he eats all day long. You can tell that he's growing every day, he keeps outgrowing all of his clothes! I'm hoping that I can make it through the rest of the warm weather here without having to buy anything new for him. His obsession with muffins, and my desire to get a variety of food into him, gave me the lightbulb moment of making sweet potato muffins.

At first I thought I could just take a basic pumpkin bread recipe and swap out sweet potato. Then I started thinking about actually making pumpkin bread (I know, I know). So, I couldn't have two breads that were essentially the same thing now could I? The answer here is No, in case you were wondering.

I started brainstorming about what flavors I wanted to go with the sweet potatoes. All I kept coming back to was my famous (within my family circle) sweet potato pie. This pie is requested by everyone at Thanksgiving. I originally got the recipe from my Aunt who was in charge of bringing it to every holiday gathering. Once our families branched off to different parts of the country, it became my responsibility for our part of the family. The pie is basically like eating candy. Not only does it include the super sweet canned sweet potatoes in heavy syrup but also brown sugar and maple syrup! It is diabetes on a plate, but oh so good!

I just had to have that taste in my bread. I needed to find a way to not only get that sweet mapley taste but not have my kid bouncing off the walls after eating it. What I came up with was a homerun! I took a basic recipe and tweaked it to be what I was looking for. It tastes exactly like the famous Thanksgiving Day pie, minus the marshmallow topping. It would have been even better with some chopped pecans thrown in but since Max is not a fan of nuts, I didn't bother with them. This recipe made 24 mini muffins and 4 mini loaves. Honestly the sugar could probably be reduced since these came out super super sweet.

Max has devoured a couple of these a day since I made them. Vince took a mini loaf to work and said that it was gone within 5 minutes. He didn't even get a piece! I plan to make this one again, in fact I'm thinking of making it for Thanksgiving instead of the sugar laden pie that really no one needs to be eating. Maybe it's time to retire Aunt Emma's Famous Sweet Potato Pie.


Sweet Potato Pie Bread
Adapted from Allrecipes


Ingredients

1 Cup Sugar
1 Cup Brown Sugar
1/4 Cup Vegetable Oil
3/4 Cup Unsweetened Applesauce
2 Large Eggs
2 Large Egg Whites
3 1/2 Cups All Purpose Flour
2 teaspoons Baking Soda
1/2 teaspoon Salt
1 teaspoon Ground Cinnamon
1/2 teaspoon Ground Nutmeg
1 teaspoon Maple Extract
2/3 Cup Reduced Fat Milk (I used 2%)
2 Cups Mashed Sweet Potatoes
Optional: 1/2 Cup Pecans, chopped

Directions
  1. Lightly grease muffin and/or loaf pans with cooking spray.
  2. Preheat oven to 350F.
  3. Add all ingredients to a large mixing bowl.
  4. Mix together just until all of the ingredients are combined.
  5. Pour into prepared pans.
  6. Bake mini muffins for about 25 minutes, mini loaves for 30-35 minutes, and regular loaves for 75 minutes (check for done-ness before removing from oven).
  7. Cool on wire racks and store in an air tight container or freeze.

Yield: 48 mini muffins or 8 mini loaves or 2 regular size loaves

Wednesday, August 29, 2012

Wee Bites - Banana Peanut Butter Mini Muffins

I've decided to start posting about some of the food that I make for Max. Toddler food can be so much fun! It's all miniaturized and cute. I try to make his food fairly healthy. I sneak in fruits and veggies whenever possible. Like most kids, Max has a sweet tooth, so I play on that in order to get him to eat more healthy stuff.

I made these muffins for the first time this week. I've made other banana muffins for Max and he always enjoys them. These have peanut butter added in to give them a protein boost. I had some over ripe bananas that needed to be used up and with Max not eating well this week (he's cutting another molar!) I thought I could kill two birds with one stone.

I initially made these following the recipe I found to the letter. Vince ended up eating that batch. They were really really good. Then I played around with the recipe to cut the sugar and butter and I think they came out pretty awesome!

These muffins were featured in this week's Muffin Tin Monday post. They have been a huge hit with Max.


Banana Peanut Butter Mini Muffins
Adapted from All Recipes


Ingredients

1/2 Cup Unsweetened Applesauce
1/2 Cup Sugar
2 Large Eggs
1/2 Cup Creamy Peanut Butter
2 Very Ripe Large Bananas
2 Cups All Purpose Flour (can sub Whole Wheat)
1 teaspoon Baking Soda
1/2 Cup Mini Chocolate Chips
Optional: 1/2 Cup Chopped Walnuts

Directions
  1. Preheat oven to 325F.
  2. Lightly grease mini muffin tins with cooking spray, or use paper muffin liners.
  3. In a large mixing bowl, cream together the applesauce, eggs, and sugar.
  4. Add the peanut butter, bananas, flour, and baking soda.
  5. Mix well, making sure the bananas are completely mashed and incorporated.
  6. Fold in the chocolate chips (and nuts if using).
  7. Pour the batter into the muffin cups until they are about 3/4 full.
  8. Bake for 20-25 minutes, until golden brown and a toothpick inserted in the center of the muffins comes out clean.
  9. Cool the muffins on a wire rack.

Yields: 48 mini muffins

Saturday, July 14, 2012

Chocolate Chip Scones & Ireland

Mmmmm...scones. I love them. In all kinds of flavor combinations. I love them warm with a little butter spread on and melting and I love them plain. Scones are a traditional quick bread hailing from the UK. They can be either sweet or savory with the most common fillings being raisins, currants, cheese, and dates. There is also the luscious lemonade scone made with lemonade and cream instead of butter and milk, yum. You can make scones as either drop biscuits or rolled and cut.

Scones are made and loved throughout the world but they are best known in England, Scotland, and Ireland. Scones were the chosen representative of Ireland at Cafe Europe, a cultural initiative of the EU president, in 2006. As much as I've always loved these flaky, buttery pastries, I've never actually made them. So, when I came across a recipe for traditional Irish scones, I knew I had to try it.

Reading through the blog post with that recipe reminded me of our awesome trip to Ireland in 2009. We had such a great time with our friends and really fell in love with the country. We spent two glorious weeks experiencing the beautiful landscapes, historical sites, and Irish culture. I can't wait to plan our next trip there. In the mean time I'll make due with cooking up all sorts of Irish food like shepherd's pie, soda bread, and now scones.

Chocolate Chip Scones
Adapted from Not Your Momma's Cookie


Ingredients

1 1/2 Cups All Purpose Flour
1/2 Cup Cake Flour
3 Tablespoons Sugar
2 1/2 teaspoons Baking Powder
3/4 teaspoon Salt
4 oz Unsalted Butter, cold and cut into pieces
3/4 Cup Mini Chocolate Chips
1/2 Cup Buttermilk (or 1/2 Cup Milk with 1 Tablespoon White Vinegar added)
2 Large Eggs
1/2 teaspoon Vanilla

Directions
  1. Preheat oven to 375F.
  2. Line a baking sheet or round pizza pan with parchment paper.
  3. In a mixing bowl, combine the flours, sugar, baking powder, and salt.
  4. Using a pastry cutter or two knives, cut the butter into the flour mixture until you get a course meal consistency.
  5. Stir in the chocolate chips.
  6. In a small bowl, whisk together the buttermilk, one egg, and vanilla.
  7. Slowly pour over the flour mixture.
  8. Gently stir together with a fork. (Do not over mix! The less you mix, the fluffier your scones will be!)
  9. Lightly knead the dough together into a ball.
  10. Place the dough onto the prepared baking sheet and pat down into a circle about 1 inch thick.
  11. Cut the dough into 12 wedges. I used a pizza cutter dipped in flour.
  12. Lightly beat an egg with a teaspoon of water and brush the top of the dough.
  13. Sprinkle the top with a little bit sugar.
  14. Bake for 17-22 minutes, until golden brown.

Yields: 12 servings


For those of you that made it through all of that, I'll reward you with a peak at our trip to Ireland. It really was beautiful!

Blarney Castle

Ballynahinch

Ballyseede Castle

Birr Castle

Blarney

Hore Abbey

Hore Abbey

Blarney Stone - Yes, I kissed it.

Cliffs of Moher

Hill of Tara

Hill of Tara

Rock of Cashel

Killkenney National Forest

The famous haunted Kinnitty Castle

Kylemore Abbey

The infamous haunted Leap Castle

Trim Castle - Filming location for Braveheart

Slane

Slane Castle

St. Patrick Statue

The Burren

Monday, April 9, 2012

Easter Bread

Italian people celebrate most life events with food. There are all sorts of "special" dishes that are only made once a year during one holiday or another. Most of those holidays are religious events too, so a lot of the special foods take on some type of religious significance.

Easter is no exception. We always had lots of rich and colorful dishes on the table for Easter dinner. We had lamb, when I was younger there would be a whole lamb (head too) but it soon turned into just a leg of lamb. We would also have pizza rustica, pastiera, and the all important Easter bread.

There was never any other name for it other than "Easter Bread", which I found a little odd. We were told that the bread was braided to look like Jesus' crown of thorns. The three eggs represented the Holy Trinity and the new life that Easter brought us. I've also heard non-religious people describe it as a "bird's nest" bread. However you want to describe it, it is colorful and fun for the holiday. It also tastes really yummy!

We would serve this bread warm, slathered in butter with a drizzle of honey on top. I remember sitting at my Grandma's dining room table the morning after Easter, drinking hot tea and eating bread with butter and honey. Making this bread always brings back fond memories from my childhood.


Easter Bread
From Grandma Caponni


Ingredients
4 - 4 1/2 Cups All Purpose Flour
2 Packages (4 1/2 teaspoons) Active Dry Yeast
1/2 Cup Whole Milk, room temperature
1/2 Cup Water, warm
2 Tablespoons Butter
2 Tablespoons Sugar
2 teaspoons Salt
7 Large Eggs

Directions
  1. In a microwave safe dish, melt the butter.
  2. Add the milk, water, sugar, and salt.
  3. Add the yeast and let sit for 3 minutes.
  4. Add 2 cups of flour.
  5. Beat in 3 eggs.
  6. Gradually add in the rest of the flour, until the dough is elastic.
  7. Knead the dough for about 8 minutes, until it is smooth.
  8. Cover the bowl with a towel and let the dough rest for 20 minutes.
  9. Punch down the dough and knead out the air bubbles.
  10. Divide the dough into 3 equal parts.
  11. Cover and let the dough rest for 3 minutes.
  12. Roll each piece of dough into a log about 15 inches long.
  13. Braid the three logs together and shape the braid into a circle, pinching the ends together to seal.
  14. Grease a cookie sheet with cooking spray.
  15. Place the braided dough onto the cookie sheet.
  16. Put 3 raw eggs into the folds of the braid.
  17. Cover with wax paper and let rest for 45 minutes.
  18. Preheat oven to 400F.
  19. Beat an egg with a teaspoon of water.
  20. Brush the egg-wash over the dough.
  21. With a small brush, paint food coloring on the eggs.
  22. Sprinkle the top of the dough with multicolored nonpareils.
  23. Bake 25-30 minutes, until the top is golden brown and the bread make a hollow sound when thumped on the bottom.
Yields: 1 Round Loaf (Approx. 16 servings)

Thursday, March 29, 2012

Bagels

I gave up all restaurant food for Lent. It actually hasn't been too bad. I've been learning to make a lot of my favorite take out food. The benefits of which are major cost savings and I am able to tailor the recipes to be lower in WW points and healthier all around. Now that I have a little more time to dedicate to cooking and baking, I've been getting back into the swing of making most of our food from scratch. I used to make all of our bread and pasta. At one point Vince told me that he prefers store bought white bread to homemade, because that is what he grew up with and knows. *sigh* Sometimes I wonder why I bother. Oh well, I don't eat a whole lot of bread so I pretty much stopped making it. I figured if Vince wanted any he would just go buy a loaf of something he likes.

I've been on a fruit an oatmeal for breakfast kick for quite some time now. I'm actually getting a little tired of it and was looking for something to change it up a little. When I saw this recipe for homemade bagels, I paused. I love bagels. Real bagels. Not the store bought ones, which are ok but not really real bagels. We didn't have time to stop and buy bagels while we were in NY and I had a little bit of a craving. I decided to dive in and try it.

I always thought that making bagels would be really complicated and difficult. It really wasn't that bad! There are a lot of steps involved and you will definitely make a mess of your kitchen but it is so, so, so worth it. I gave some to my neighbors to try and they raved. Vince brought some to work and refused to share. These really are excellent. I will say that they still don't really compare to real NY bagels but they are a good substitute. I found it a little difficult to get the pieces to be the size that I wanted and I wasn't really able to get them into a proper "doughnut-like" shape but they were close. I'll just have to keep making them until I perfect it. :)


Bagels
Adapted from Good Thymes & Good Food


Ingredients
2 Cups Warm Water
4 1/2 teaspoons Active Dry Yeast
3 Tablespoons Sugar
1 Tablespoon Salt
5 3/4 Cups All Purpose Flour
4 Quarts Water
1 Tablespoon Sugar
Cornmeal, for dusting the pan
1 Large Egg, beaten with a little water
Desired toppings (I used poppy seeds, sesame seeds, onion powder, and dried minced onion)

Directions
  1. In the bowl of an electric mixer, stir together the yeast and warm water.
  2. Let stand for 5 minutes.
  3. Add the sugar and salt.
  4. Gradually mix in 4 cups of flour.
  5. Mix with the dough hook for about 5 minutes.
  6. Add in 1 1/4 cups more flour.
  7. Continue kneading until the dough is smooth and elastic, add more flour as needed to prevent the dough from being sticky.
  8. Place the dough in a greased bowl and cover with a clean towel.
  9. Let the dough rise until doubled, about 1 hour.
  10. Punch down the dough and divide it into three equal parts.
  11. Taking one part at a time, for the dough into a log and cut each log into equal size pieces (6 pieces would be the size of a store bought bagel).
  12. Knead each piece into a small ball and poke your thumbs through the center. With your thumbs in the center hole, work your fingers around the perimeter of the dough making a doughnut shape.
  13. Place the bagels on a floured surface and let rise for 20 minutes.
  14. Preheat oven to 400F.
  15. In a pot wide enough to fit 4-5 bagels, boil 4 quarts of water with a tablespoons of sugar.
  16. Adjust the heat to keep the water simmering.
  17. Lightly grease a baking sheet and liberally sprinkle with cornmeal.
  18. Carefully drop the bagels into the boiling water, 4 at a time.
  19. Boil for 30 seconds on each side of the bagel.
  20. Lift the bagels out of the water with a slotted spoon and blot on a paper towel.
  21. Place the bagels on the prepared baking sheet.
  22. Bruch each bagel with the egg wash.
  23. Sprinkle the tops of the bagels with any desired toppings.
  24. Bake for 20 minutes, until they are a rich brown.
  25. Cool on a wire rack.

Yields: 18 Bagels

Tuesday, March 20, 2012

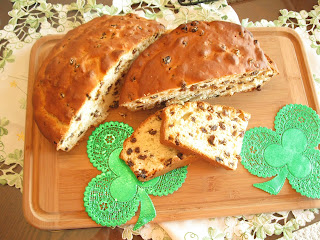
Irish Soda Bread

We just got back from a long weekend in NY visiting family. We spent St. Patrick's Day at my grandma's house in the Bronx. Max wore the cutest little outfit and got lots of kisses, because he's Irish (and really cute)!

Before we left for the weekend, I made a couple loaves of soda bread and two pans of Bailey's Irish Cream brownies. I brought one loaf of bread and one pan of brownies to NY with us and the other I sent upstairs to Nelda for Friday Martini Night. I haven't heard back about how it went over with everyone there but they were a hit at my grandma's house.

I've been making this recipe for soda bread for so long that I don't really know where I got it from. It is a pretty basic recipe and comes out perfect almost every time. It makes a huge round loaf so be prepared to share!


Irish Soda Bread


Ingredients
1/4 Cup Sugar
4 Cups All Purpose Flour
2 teaspoons Baking Powder
1 teaspoon Baking Soda
3/4 teaspoon Salt
3 Cups Raisins
2 Large Eggs
1 1/4 Cups Buttermilk
1 Cup Sour Cream

Directions
  1. Preheat oven to 350F.
  2. Grease a 9 inch round cake pan with cooking spray.
  3. In a mixing bowl, combine the flour, sugar, baking powder, baking soda, salt, and raisins.
  4. Add the eggs, sour cream, and buttermilk.
  5. Mix until well moistened and a very sticky batter is formed.
  6. Pour batter into the cake pan and dust the top with a little flour.
  7. Bake for 65-75 minutes, until the crust is golden brown and the middle is cooked through.

Yields: 1 Round Loaf (approx. 16 servings)

Monday, July 5, 2010

Best Banana Bread Ever

I love banana bread. There are two schools of thought when it comes to this nutty banana confection. Some people like their banana bread to be like bread. My mom for example makes an excellent banana bread that can be sliced, toasted, and buttered. Just like any other bread but with a nutty banana flavor. I, on the other hand, prefer my banana bread to be more cake-like. I prefer a sweet, light bread that could pass for a muffin. And I really like it with chocolate chips.

I have been making banana bread for years. Usually just once or twice a year during my quest for the perfect recipe. The perfect balance of sweetness and nuttiness, of bread and muffin. Up until last month I was still searching. I had found some decent recipes but none that really stuck out in my mind and none that I had bothered to put into my recipe book for future use. That is until last month.

Last month I was preparing to go to Phoenix to visit my mom. I knew that I had a long flight with a 3 hour lay-over. I also knew that I did not want to spend a boatload of money on airport food or even worse, airplane food. So I decide to pack myself a dinner and snack.

I made a yummy turkey sandwich on homemade whole wheat bread with lettuce, tomato, and mayo. I was going to pack some fruit when I noticed that I had 3 very over-ripe bananas sitting in the fruit bowl. What else do you do with over-ripe bananas besides make banana bread?

So I hit the internet on a search for a quick recipe that used what I had handy in the house. I finally ran across an awesome recipe on the blog How Sweet It Is.

I tweaked the recipe to add an extra banana, walnuts, and make the whole thing dairy-free. It is seriously the best banana bread I've ever eaten. It is moist, sweet, nutty, and full of banana flavor. I made 4 mini loaves so I could bring some to my mom in Phoenix. We ended up eating all of it within my first week there.

I don't know how to put into words how good this bread is. I've already made the recipe twice since returning from Phoenix last month. I even purposely bought bananas and let them over-ripen just so I could make this bread with them. I currently have 2 mini loaves in the freezer, for fear that we will eat them too quickly.

If you are ever going to make a banana bread, make this one. If you have made one before and didn't like it...make this one instead. I guarantee you will fall in love with it.

Best Banana Bread Ever
From How Sweet It Is


Ingredients

1 Stick Margarine, Softened
3oz Soy Cream Cheese (Tofutti brand)
1 Cup Brown Sugar
3 Very Ripe Bananas
1 Large Egg
1/4 Cup Soy Sour Cream (Tofutti brand)
1 1/2 Cups All Purpose Flour (may substitute Whole Wheat)
1 Teaspoon Baking Soda
1 Teaspoon Baking Powder
1/2 Teaspoon Salt
1 Cup Chocolate Chips
1 1/2-2 Cups Chopped Walnuts

Directions
  1. Preheat oven to 350 degrees (F).
  2. Grease or line pans.
  3. In a large bowl, cream the margarine, sugar, and cream cheese until light and fluffy.
  4. Add the bananas, sour cream, and egg.
  5. Mix until smooth.
  6. Mix in the flour, salt, baking soda, and baking powder.
  7. Fold in the chocolate chips and walnuts.
  8. Bake until a toothpick comes out clean.

This can be baked in 2 regular sized loaf pans for 60-75 minutes, 4 mini loaf pans for 35-40 minutes, or in regular size muffin pans for 25-30 minutes. These baking times are approximate and will vary by oven and location.

Yields: 2 loaves

Don't be afraid to experiment with this recipe! Try different kinds of nuts or different types of chips (peanut butter chips would be interesting). It really is a very tailorable recipe.